Hexo结构
搭建环境
安装NodeJS与Git,新建目录用于存放博客,如下命令皆在博客根目录执行,初始化Hexo:
安装基础组件:
1
2
| npm install hexo-cli -g
npm install hexo-deployer-git |
安装主题,如Minos:
此时文件夹结构如下所示:
- node_modules
- scaffolds
- source
- themes
- minos(主题名)
- languages:
- layout:页面模板文件,控制如何生成页面,使用EJS编写
- scripts:
- source:存放主题使用的css,js,font等
- _config.yml:站点配置文件
- package.json:在该目录安装的node库及版本号
修改_config.yml中的theme为Minos(前面的主题名),此时在Git Bash内执行hexo s可预览显示结果
执行npm install可以自动安装package.json中指定的包
自动部署Github Page
在Github上新建两个仓库:
- blog_source:存放博客源文件,草稿等内容,命名随意,此为示意
- 用户名.github.io:存放最终部署的网页,必须为该格式
生成SSH密钥:执行下列命令后,在.ssh文件夹下将生成id_ed25519与id_ed25519.pub
1
| ssh-keygen -t ed25519 -C "邮箱" |
Github Page仓库设置
Github Page仓库的搭建:参考文档,以用户名.github.io为仓库名新建公开仓库即可
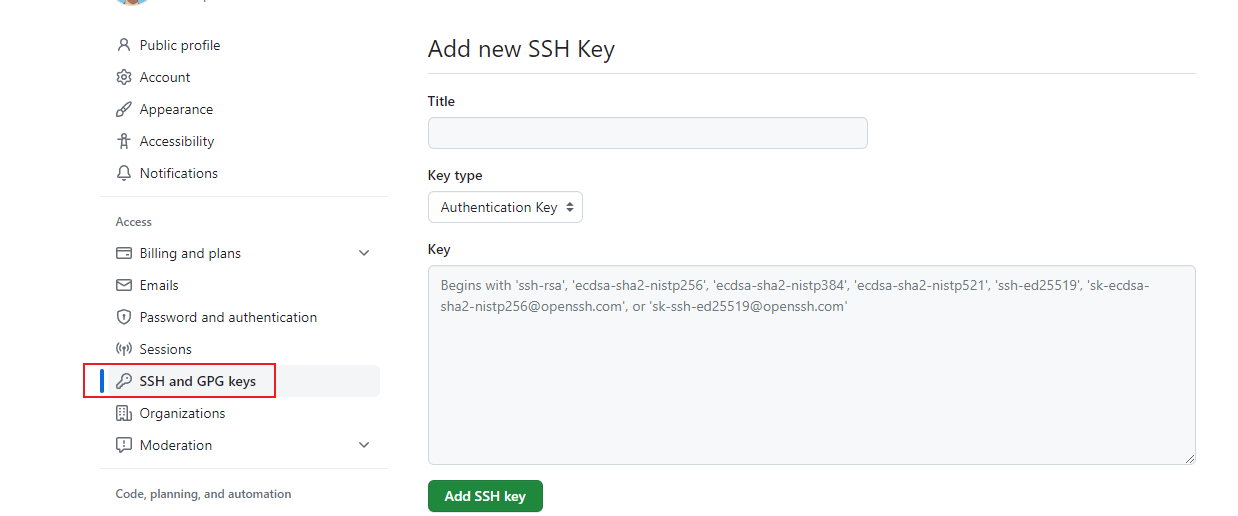
在用户Settings -> SSH and GPG Keys下添加SSH Keys的公钥,注意是用户而非仓库设置
博客源仓库设置
blog_source需要进行如下设置:
上传上一节的目录到Github仓库中
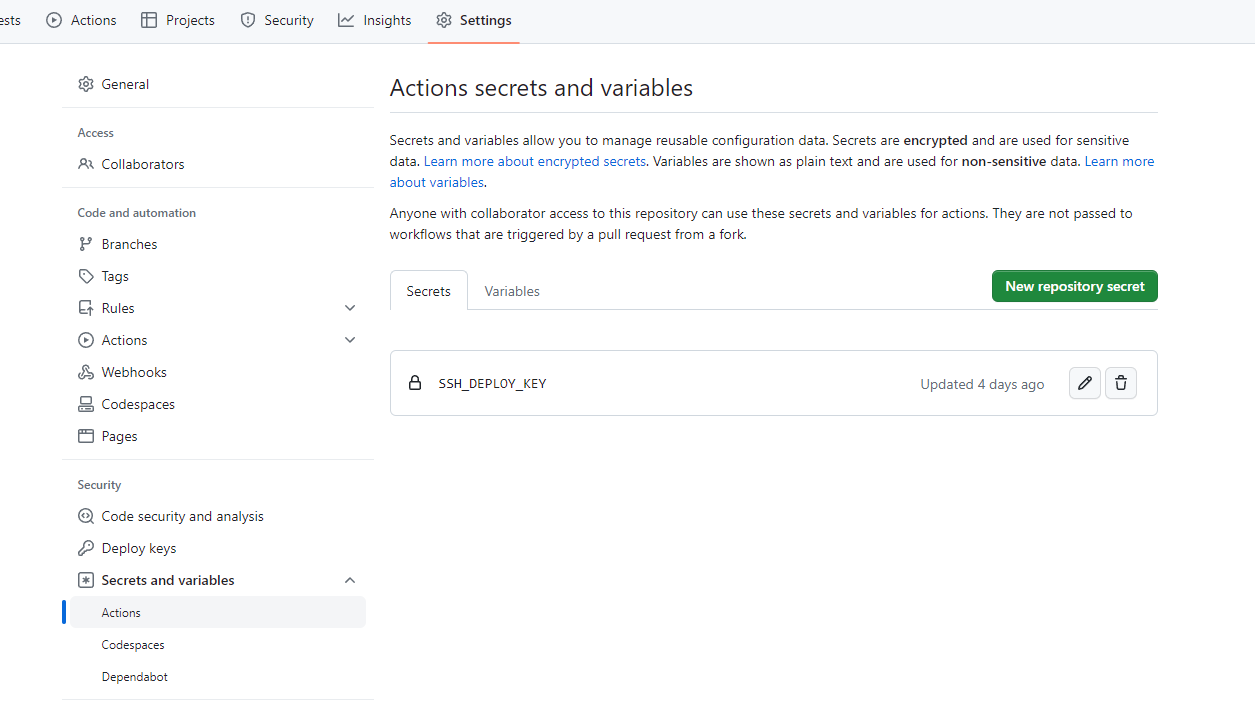
的Settings ->Secrets and variables ->Actions中添加SSH私钥,命名为SSH_DEPLOY_KEY
- 仓库的根目录添加
.github/workflows/deployment.yml,其内容如下:
1
2
3
4
5
6
7
8
9
10
11
12
13
14
15
16
17
18
19
20
21
22
23
24
25
26
27
28
29
30
31
32
33
34
35
36
37
38
39
40
| name: Deployment
on: push
jobs:
deployment:
runs-on: ubuntu-latest
name: Deployment
steps:
- name: Check Out
uses: actions/checkout@v3
- name: Clone Repo
uses: actions/checkout@v3
with:
repository: lonelyWaiting/lonelyWaiting.github.io.git
ref: master
path: .deploy_git
- name: Setup Node
uses: actions/setup-node@v3
with:
node-version: 12.14
- name: Setup Git
run: |
git config --global user.name "lonelyWaiting"
git config --global user.email "lonelywaitinggm@gmail.com"
- name: Setup SSH Key
run: |
mkdir -p ~/.ssh
echo "${{ secrets.SSH_DEPLOY_KEY }}" > ~/.ssh/id_ed25519
chmod 600 ~/.ssh/id_ed25519
- name: Deploy
run: |
npm install -g hexo-cli
npm install
hexo d -g |
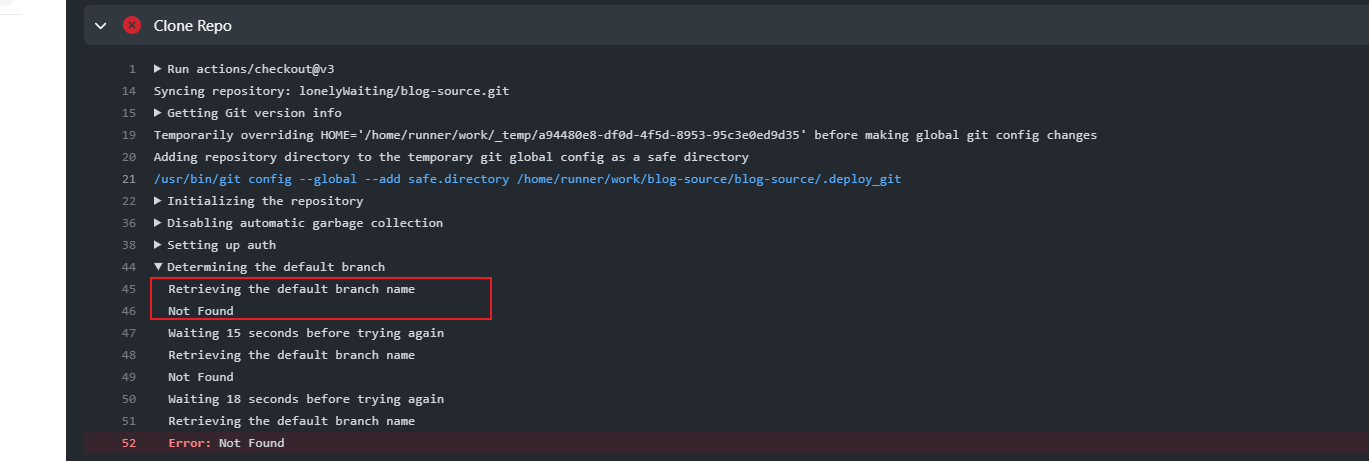
注意上面的repository填写格式为:Username/RepositoryName,如果仓库名配置错误,会出现类似报错:
Github Actions解读
自动部署利用的是Github Actions,该功能会自动查找项目下的.github/workflows下的yml文件
每一个yml文件为一个Action,每个Action可以包含多个Step:
- Checkout: 拉取当前仓库的最新提交
- Clone Repo:拉取部署仓库的最新提交
- Setup Node:安装指定版本NodeJS
- Setup Git:设置Git全局用户设置
- Setup SSH Key:将仓库中配置的私钥写入到机器的
.ssh中,用于后续提交验证
- Deploy:安装Hexo必备组件以及执行生成,部署操作
主题配置
修改_config.yml的theme项:
使用Minos时将会出现网页显示德文的情况,需要配置语言项,修改_config.yml的language项为:
启用disqus,_config.yml中配置disqus如下:
1
2
3
| comment:
type: disqus
shortname: lonelywaiting |
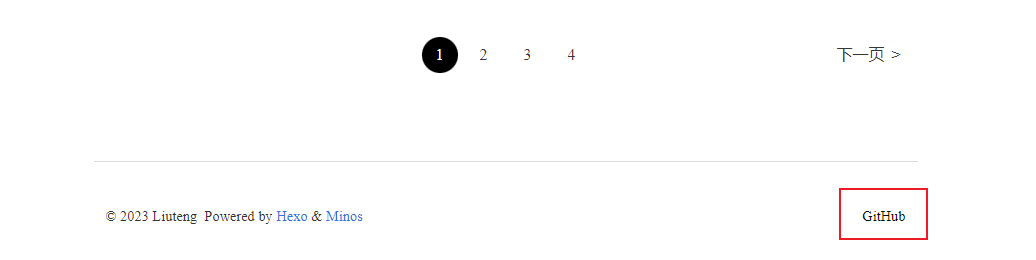
添加页面底部链接:
1
2
| footer_links:
Github: https://github.com/用户名 |
导航栏添加Github跳转地址:
1
2
3
4
| navbar_links:
GitHub:
icon: fab fa-github
url: https://github.com/用户名 |

_config.yml添加Logo:Logo文件放在根目录/source/,命名为favicon.ico

编辑_config.yml,启用MathJax支持:
使用
创建文章:hexo new [layout] <title>,默认layout为Post
创建Post:
创建页面:
创建草稿页面:
发布草稿:注意文件名不包含md后缀
本地预览:
生成并部署:
本机预览草稿:
功能扩展
标题自动生成序号
添加自定义CSS
Minos会自动扫描minos/layout/plugins下的文件并作为插件加载,添加custom.ejs,内容如下:
1
| <link href="/css/user.css" rel="stylesheet" type="text/css"> |
上述代码会加载user.css,在minos/source/css/下添加user.css用于自定义样式表
定义标题序号
- counter-reset: 定义计数器并默认设置为0
1
2
3
4
5
6
7
8
9
10
11
12
13
14
15
16
17
18
19
20
21
22
23
24
25
26
27
28
| body {
counter-reset: body;
/* 修改正文字体 */
font-family: "Vollkorn", Palatino, Times;
color: #333;
line-height: 1.4;
text-align: justify;
}
/* 正文标题自动序号 */
h1 {
counter-reset: h1;
}
h2 {
counter-reset: h2;
}
h3 {
counter-reset: h3;
}
h4 {
counter-reset: h4;
}
h5 {
counter-reset: h5;
}
h6 {
counter-reset: h6;
} |
标题前添加序号
1
2
3
4
5
6
7
8
9
10
11
12
13
14
15
16
17
18
19
20
21
22
23
24
| h1:before {
counter-increment: body;
content: counter(body) ". ";
}
h2:before {
counter-increment: h1;
content: counter(body) "." counter(h1) ". ";
}
h3:before {
counter-increment: h2;
content: counter(body) "." counter(h1)"." counter(h2) ". ";
}
h4:before {
counter-increment: h3;
content: counter(body) "." counter(h1)"." counter(h2)"." counter(h3) ". ";
}
h5:before {
counter-increment: h4;
content: counter(body) "." counter(h1)"." counter(h2)"." counter(h3)"." counter(h4) ". ";
}
h6:before {
counter-increment: h5;
content: counter(body) "." counter(h1)"." counter(h2)"." counter(h3)"." counter(h4)"." counter(h5) ". ";
} |
移除文章标题的序号
1
2
3
4
5
6
7
8
9
| h1:before {
counter-increment: body;
content: counter(body) ". ";
}
/*必须位于h1:before之后,靠后的规则优先级更高*/
h1.article-title:before {
content: none;
} |
Hover状态下添加序号
默认Hover状态下会在标题前添加#并设置其位置,这与序号的添加方案冲突
因此需要重载Hover也自动添加序号,因此2.1.3节修改为如下结果:
1
2
3
4
5
6
7
8
9
10
11
12
13
14
15
16
17
18
19
20
21
22
23
24
25
26
27
28
29
30
31
32
33
34
35
36
| h1:before ,
.article .article-entry h1:hover:before {
counter-increment: body;
content: counter(body) ". ";
position: unset;
}
h2:before ,
.article .article-entry h2:hover:before {
counter-increment: h1;
content: counter(body) "." counter(h1) ". ";
position: unset;
}
h3:before ,
.article .article-entry h3:hover:before {
counter-increment: h2;
content: counter(body) "." counter(h1)"." counter(h2) ". ";
position: unset;
}
h4:before ,
.article .article-entry h4:hover:before {
counter-increment: h3;
content: counter(body) "." counter(h1)"." counter(h2)"." counter(h3) ". ";
position: unset;
}
h5:before ,
.article .article-entry h5:hover:before {
counter-increment: h4;
content: counter(body) "." counter(h1)"." counter(h2)"." counter(h3)"." counter(h4) ". ";
position: unset;
}
h6:before ,
.article .article-entry h6:hover:before {
counter-increment: h5;
content: counter(body) "." counter(h1)"." counter(h2)"." counter(h3)"." counter(h4)"." counter(h5) ". ";
position: unset;
} |
避免序号跨文章自增
在Page页面由于会出现多个文章的预览,但由于前面的计数方案只是以某级标题的数量进行自增
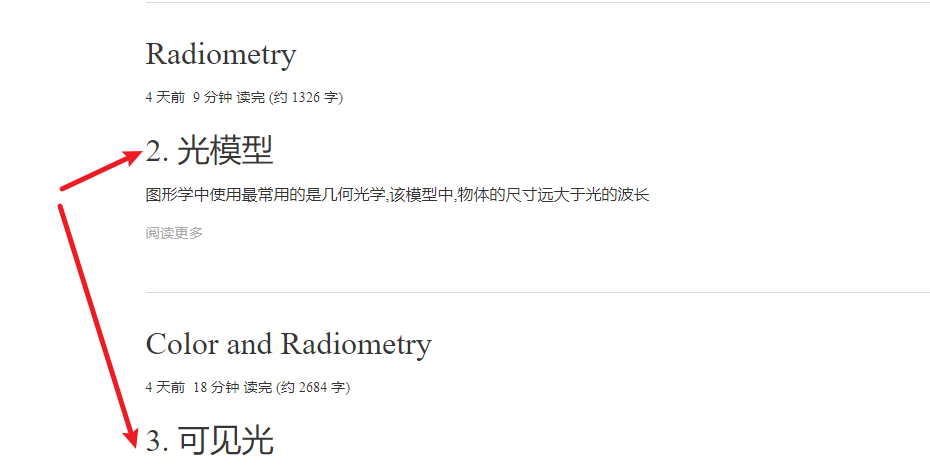
但正确的显示方案是每篇文章都从0开始自增,因此,在遇到文章标题时自动重置计数器:
1
2
3
| h1.article-title {
counter-reset: body h1 h2 h3 h4 h5 h6;
} |
调试方法
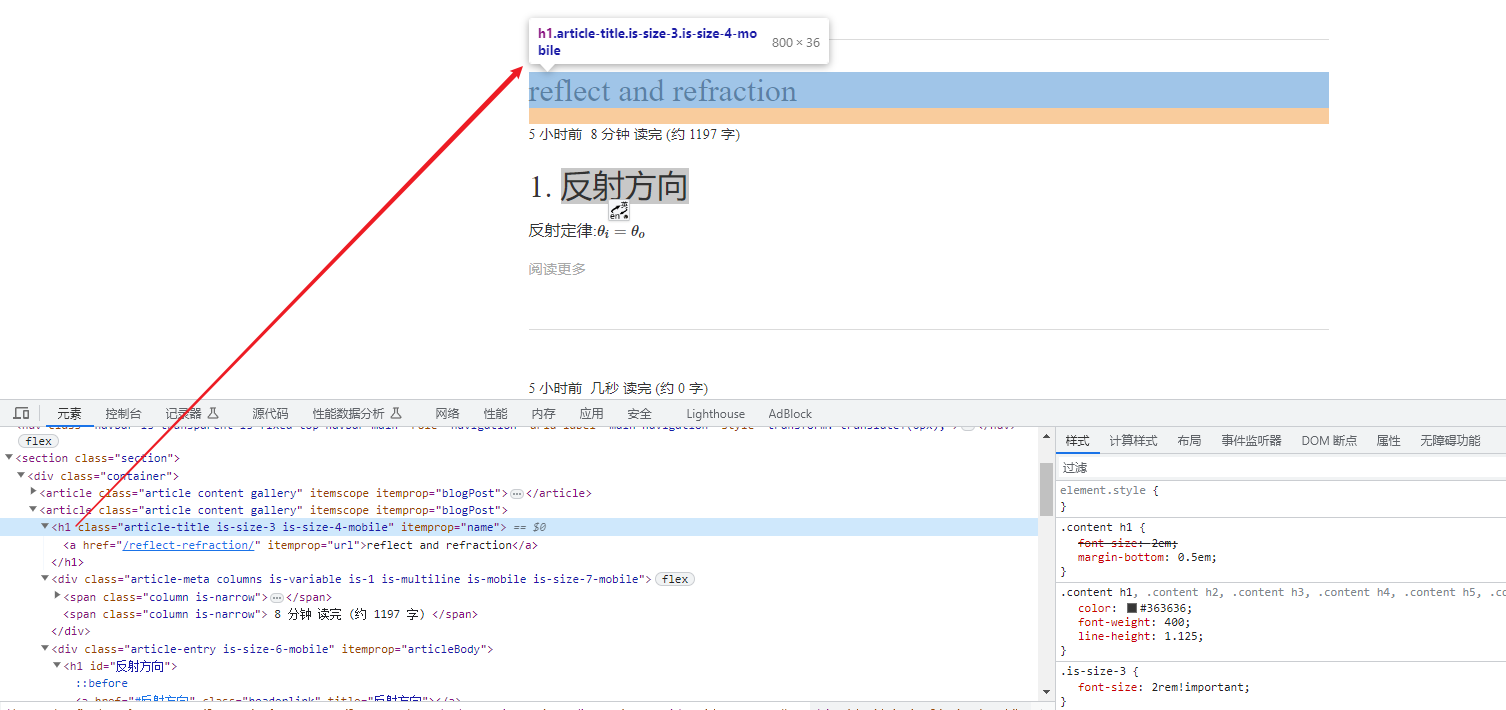
使用右键–检查元素或者F12可以调试网页,可以选中元素对应的HTML,页面将会显示出其CSS标签,便于在CSS中匹配标签:
以下图为例,鼠标在元素窗口选中标题时,页面中显示了对应的CSS,因此我们可以通过如下标签进行选择:
1
2
3
| h1.article-title:before {
content: none
} |
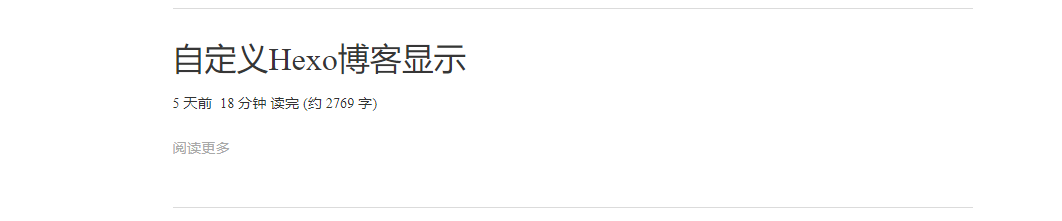
默认添加ReadMore
不添加<!-- more -->时,默认显示全文改为显示Read More链接,文章显示很乱
修改layout/common/article.ejs,找到post.excerpt,修改对应部分如下:
1
2
3
4
5
6
7
8
9
10
11
12
13
14
15
16
17
18
19
| <div class="article-entry is-size-6-mobile" itemprop="articleBody">
<% if (post.excerpt && index){ %>
<%- post.excerpt %>
<p class="article-more-link">
<a href="<%- url_for(post.path) %>#more"><%= __('article.read_more') %></a>
</p>
<% } else { %>
<!-- 以下为原值 -->
<!-- <%- post.content %> -->
<!-- 以下为修改结果 -->
<% if (index) { %>
<p class="article-more-link">
<a href="<%- url_for(post.path) %>#more"><%= __('article.read_more') %></a>
</p>
<% } else { %>
<%- post.content %>
<% } %>
<% } %>
</div> |
可在_config.yml中配置article的read_more,即可修改链接显示文字,默认为Read More:
1
2
| article:
read_more: Read More |
添加文章目录
在themes/minos/layout/下新建inject目录,并在其中新建toc.ejs,其实现如下:
1
2
3
4
5
| <% if (!index && has_config('toc') && get_config('toc') && typeof(page.content) !== 'undefined') { %>
<div class="toc-title is-hoverable has-dropdown is-hidden-mobile is-hidden-tablet-only toc">
<%- toc(post.content, {list_number: false}) %>
</div>
<% } %> |
toc()为Hexo提供的辅助函数,用于生成文章目录,list_number用于控制是否生成列表序号
由于只希望在Article页面创建目录,因此需要在Article.ejs中引用该EJS,在Article.ejs的content前添加即可:
1
| <%- partial('inject/toc') %> |
最终EJS如下:
1
2
3
4
5
6
7
8
9
10
11
12
13
14
15
16
17
| <div class="article-entry is-size-6-mobile" itemprop="articleBody">
<% if (post.excerpt && index){ %>
<%- post.excerpt %>
<p class="article-more-link">
<a href="<%- url_for(post.path) %>#more"><%= __('article.read_more') %></a>
</p>
<% } else { %>
<% if (index) { %>
<p class="article-more-link">
<a href="<%- url_for(post.path) %>#more"><%= __('article.read_more') %></a>
</p>
<% } else { %>
<%- partial('inject/toc') %>
<%- post.content %>
<% } %>
<% } %>
</div> |
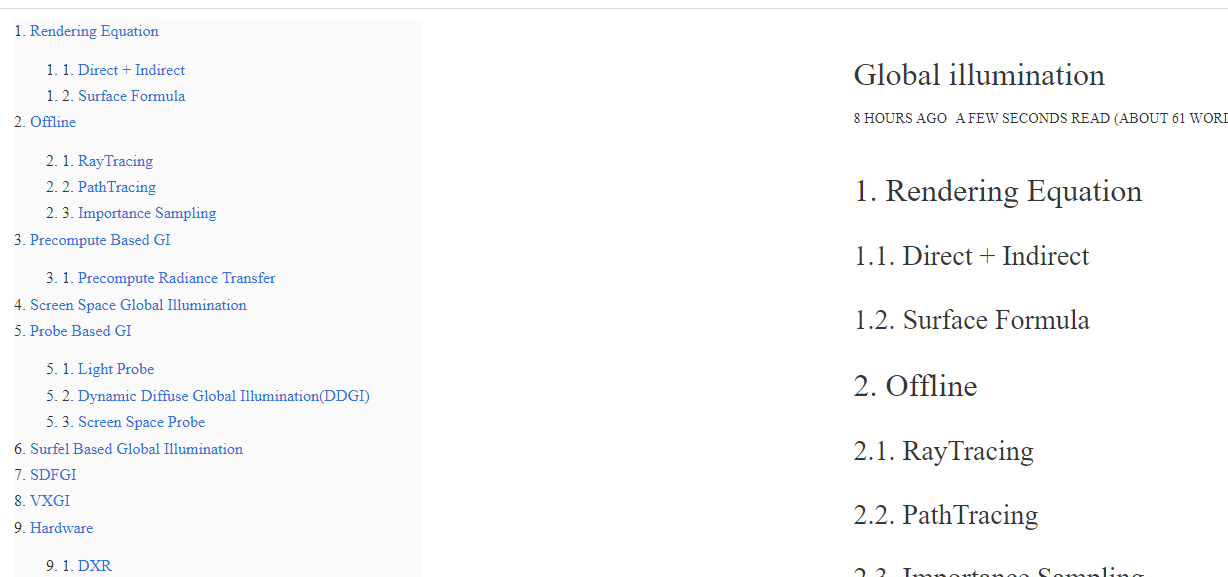
此时打开文章便可在页面顶部看到目录显示了。但是还需要为目录添加标题序号支持,以及期望与文章的序号单独计数
目录对应的HTML代码如下所示:
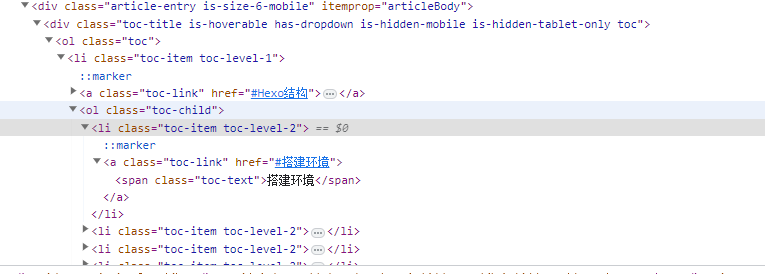
因此,我们可以通过使用toc-item.toc-level-1等匹配各级目录
首先匹配class为toc的标签,设置目录位于页面的左侧,位置采用fixed,取消list-style,并定义计数器toc-body为0
1
2
3
4
5
6
7
8
9
| .toc {
left: 0%;
top: 5%;
position: fixed;
margin: 5px;
list-style: none;
counter-reset: toc-body;
background-color: #fafafa;
} |
若不取消list-style,每一级目录结构都会按照1~N的形式递增,如:
- 目录1
- 子目录1
- 子目录2
- 子目录3
- 目录2
- 子目录1
- 子目录2
另外匹配各级目录标签并定义计数器:
1
2
3
4
5
6
7
8
9
10
11
12
13
14
15
16
17
18
19
20
21
22
23
24
| .toc-item.toc-level-1 {
counter-reset: toc-level-1;
list-style: none;
}
.toc-item.toc-level-2 {
counter-reset: toc-level-2;
list-style: none;
}
.toc-item.toc-level-3 {
counter-reset: toc-level-3;
list-style: none;
}
.toc-item.toc-level-4 {
counter-reset: toc-level-4;
list-style: none;
}
.toc-item.toc-level-5 {
counter-reset: toc-level-5;
list-style: none;
}
.toc-item.toc-level-6 {
counter-reset: toc-level-6;
list-style: none;
} |
在目录前生成序号内容:
1
2
3
4
5
6
7
8
9
10
11
12
13
14
15
16
17
18
19
20
21
22
23
24
| .toc-item.toc-level-1:before {
counter-increment: toc-body;
content: counter(toc-body) ". ";
}
.toc-item.toc-level-2:before {
counter-increment: toc-level-1;
content: counter(toc-body) ". " counter(toc-level-1) ". ";
}
.toc-item.toc-level-3:before {
counter-increment: toc-level-2;
content: counter(toc-body) ". " counter(toc-level-1) ". " counter(toc-level-2) ". ";
}
.toc-item.toc-level-4:before {
counter-increment: toc-level-3;
content: counter(toc-body) ". " counter(toc-level-1) ". " counter(toc-level-2) ". " counter(toc-level-3) ". ";
}
.toc-item.toc-level-5:before {
counter-increment: toc-level-4;
content: counter(toc-body) ". " counter(toc-level-1) ". " counter(toc-level-2) ". " counter(toc-level-3) ". " counter(toc-level-4) ". ";
}
.toc-item.toc-level-6:before {
counter-increment: toc-level-5;
content: counter(toc-body) ". " counter(toc-level-1) ". " counter(toc-level-2) ". " counter(toc-level-3) ". " counter(toc-level-4) ". " counter(toc-level-5) ". ";
} |
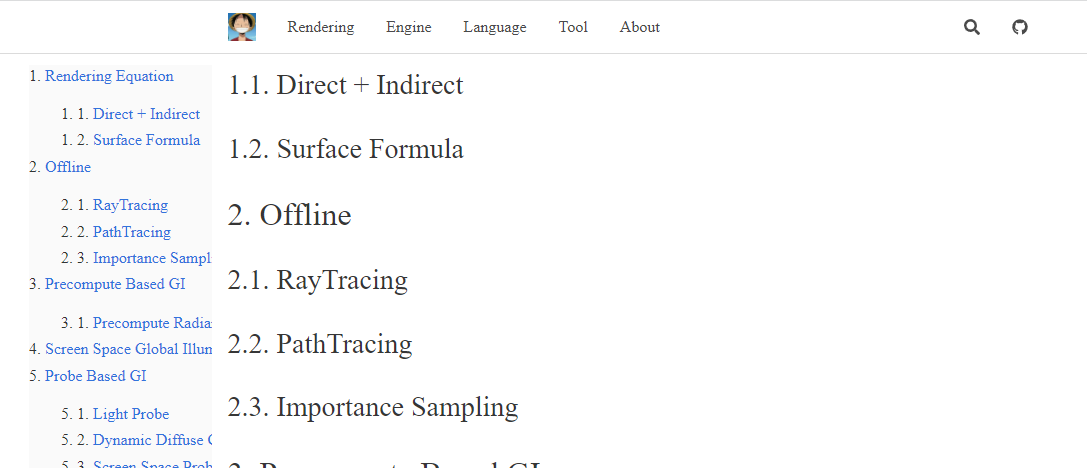
此时效果:
但当页面宽度不足时,会出现内容与目录重叠的现象:

对此,可以通过修改目录的max-width来实现目录显示区域的收缩,修改themes/minos/source/js/script.js,添加如下代码:
1
2
3
4
5
6
7
8
9
10
11
12
13
14
15
16
17
| const sectionDiv = $('.section')[0];
const resizeObserver = new ResizeObserver(entries => {
for (let entry of entries) {
if (entry.target === sectionDiv) {
const contentDiv = $('.article.content.gallery');
const contentWidth = parseInt($(contentDiv).css('width'));
const leftPadding = parseInt($(sectionDiv).css('padding-left'));
const tocPadding = 24;
var maxToWidth = (sectionDiv.offsetWidth - contentWidth) / 2 - leftPadding - tocPadding;
if (maxToWidth < 0) maxToWidth = 0;
$('.toc').css('max-width', maxToWidth + 'px');
}
}
});
resizeObserver.observe(sectionDiv); |
- window的resize事件无法正确处理该情况,因为resize时某些属性的计算可能还未完成,取到的数据不可信
此时当页面宽度不足时,目录与文章内容无交叠但目录的文字会Wrap,可通过css将其修改为截断+滚动条的形式:
1
2
3
4
5
| .toc {
text-overflow: ellipsis;
white-space: nowrap;
overflow: auto;
} |
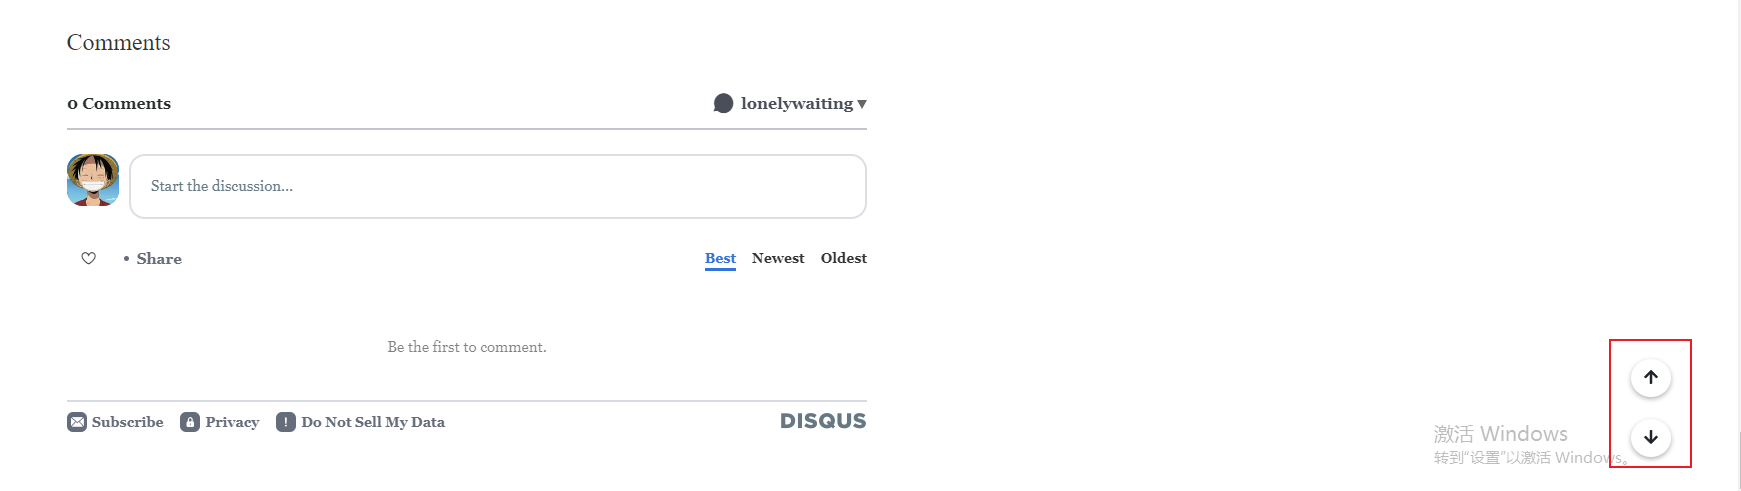
最终页面宽度不足时的效果为:
一键回到顶部/底部
出于便捷的目的添加此功能,首先在Themes/minos/layout/inject下新建fast-scroll.ejs,内容如下:
1
2
3
4
5
6
7
8
9
10
11
12
13
14
| <% if (has_config('fast-scroll') && get_config('fast-scroll') && typeof(page.content) !== 'undefined') { %>
<div id="fast-scroll">
<a href="#">
<button id="scroll-to-top" class="fast-btn btn-top" aria-label="Scroll to top" style="right: 67.5px; bottom: 120px; display: inline-block;">
<i class="fas fa-arrow-up">
</button>
</a>
<a href="#footer">
<button id="scroll-to-down" class="fast-btn btn-down" aria-label="Scroll to down" style="right: 67.5px; bottom: 60px; display: inline-block;">
<i class="fas fa-arrow-down">
</button>
</a>
</div>
<% } %> |
上述代码添加了两个href用于跳转页面顶部(#)与底部(#footer),并在链接下各自创建了一个按钮,以及向上与向下的图标。
接下来在footer.ejs中调用上述代码即可,将其添加与footer.ejs的底部即可,如下所示:
1
2
3
4
5
6
| <footer class="footer" id="footer">
<div class="container">
<!-- 省略原有代码 -->
</div>
<%- partial('inject/fast-scroll') %>
</footer> |
另外需要注意的是,这里为footer元素添加了id="footer",用于fast-scroll.ejs中通过href跳转至footer
前面fast-scroll.ejs中指定了按钮的位置,接下来在css中详细定义其样式,如下所示:
1
2
3
4
5
6
7
8
9
10
11
12
13
14
15
16
17
18
19
20
21
22
23
24
25
26
27
28
29
30
31
32
33
34
35
36
37
38
39
40
41
42
43
44
45
46
47
48
49
50
51
52
53
54
55
| .fast-btn {
background-color: #fff;
color: rgb(33, 37, 41);
border-bottom-color: rgb(255, 255, 255);
border-bottom-left-radius: 50%;
border-bottom-right-radius: 50%;
border-bottom-style: solid;
border-bottom-width: 1px;
border-image-outset: 0;
border-image-repeat: stretch;
border-image-slice: 100%;
border-image-source: none;
border-image-width: 1;
border-left-color: rgba(0, 0, 0, 0);
border-left-style: solid;
border-left-width: 1px;
border-right-color: rgba(0, 0, 0, 0);
border-right-style: solid;
border-right-width: 1px;
border-top-color: rgba(0, 0, 0, 0);
border-top-left-radius: 50%;
border-top-right-radius: 50%;
border-top-style: solid;
border-top-width: 1px;
box-shadow: rgba(0, 0, 0, 0.3) 0px 2px 5px 0px;
box-sizing: border-box;
line-height: 24px;
position: fixed;
font-size: 16px;
font-weight: 400;
outline-color: rgb(33,37,41);
outline-style: none;
outline-width: 0px;
padding-bottom: 6px;
padding-left: 12px;
padding-right: 12px;
padding-top: 6px;
text-shadow: none;
}
.fast-btn:hover {
border-left-color: rgb(0, 0, 0);
border-right-color: rgb(0, 0, 0);
border-top-color: rgb(0, 0, 0);
border-bottom-color: rgb(0, 0, 0);
}
.fast-btn:active {
border-left-color: rgb(0, 0, 0);
border-right-color: rgb(0, 0, 0);
border-top-color: rgb(0, 0, 0);
border-bottom-color: rgb(0, 0, 0);
background-color: rgb(0,0,0);
color: white;
} |
最后在themes/minos/_config.yml中开启该功能,即可看到最终效果:
最终表现效果为:上述CSS中还定义了hover与active状态下的样式,这里不做展示
博客与笔记整合
本地使用Typora作为Markdown编辑器,为了与最终的显示不形成过大差异,同样对Typora进行定制:
Typora结构
Typora提供了多种主题配置,可以通过自定义CSS进行样式定制,其CSS加载规则为:
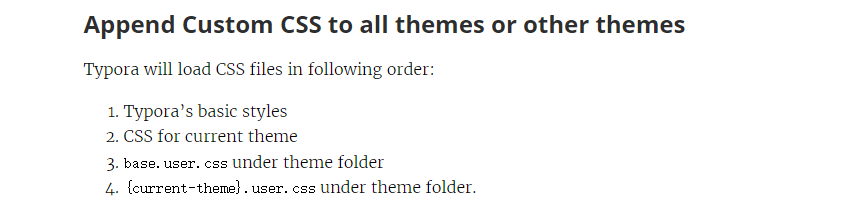
因此,可以在C:\Users\用户名\AppData\Roaming\Typora\themes下新建/修改base.user.css进行样式定制
但并非所有的功能仅依靠CSS就能完成,需要修改HTML结构才能做到。
这种就需要修改C:\Program Files\Typora\resources\window.html才能实现,后续插件便是基于此
标题自动序号
与Hexo不同的是,Typora的样式表改造只需要专注于文章本身,不涉及显示多个文章的概览等情况。
在Hexo中会使用文章名在网页中作为标题进行显示,然而Typora却默认不会,因此这里不对首个h1标题特殊处理
首先定义各级标题的计数器:
1
2
3
4
5
6
7
8
9
10
11
12
13
14
15
16
17
18
19
20
21
22
23
24
25
26
27
28
29
30
| body {
counter-reset: body;
/* 修改正文字体 */
font-family: "Vollkorn", Palatino, Times;
color: #333;
line-height: 1.4;
text-align: justify;
}
/* 正文标题自动序号 */
h1 {
counter-reset: h1;
}
h2 {
counter-reset: h2;
}
h3 {
counter-reset: h3;
}
h4 {
counter-reset: h4;
}
h5 {
counter-reset: h5;
}
h6 {
counter-reset: h6;
} |
然后在各级标题前添加序号:
1
2
3
4
5
6
7
8
9
10
11
12
13
14
15
16
17
18
19
20
21
22
23
24
| h1:before {
counter-increment: body;
content: counter(body) ". ";
}
h2:before {
counter-increment: h1;
content: counter(body) "." counter(h1) ". ";
}
h3:before {
counter-increment: h2;
content: counter(body) "." counter(h1)"." counter(h2) ". ";
}
h4:before {
counter-increment: h3;
content: counter(body) "." counter(h1)"." counter(h2)"." counter(h3) ". ";
}
h5:before {
counter-increment: h4;
content: counter(body) "." counter(h1)"." counter(h2)"." counter(h3)"." counter(h4) ". ";
}
h6:before {
counter-increment: h5;
content: counter(body) "." counter(h1)"." counter(h2)"." counter(h3)"." counter(h4)"." counter(h5) ". ";
} |
此时重启Typora便可看到自动编号的标题了
侧边大纲自动序号
方法与文章内标题一致,首先定义计数器:
1
2
3
4
5
6
7
8
9
10
11
12
13
14
15
16
17
18
19
20
21
22
23
| .sidebar-content {
counter-reset: h1
}
.outline-h1 {
counter-reset: h2
}
.outline-h2 {
counter-reset: h3
}
.outline-h3 {
counter-reset: h4
}
.outline-h4 {
counter-reset: h5
}
.outline-h5 {
counter-reset: h6
} |
在各级标题前生成序号内容:
1
2
3
4
5
6
7
8
9
10
11
12
13
14
15
16
17
18
19
20
21
22
23
24
25
26
27
28
29
| .outline-h1>.outline-item>.outline-label:before {
counter-increment: h1;
content: counter(h1) ". "
}
.outline-h2>.outline-item>.outline-label:before {
counter-increment: h2;
content: counter(h1) "." counter(h2) ". "
}
.outline-h3>.outline-item>.outline-label:before {
counter-increment: h3;
content: counter(h1) "." counter(h2) "." counter(h3) ". "
}
.outline-h4>.outline-item>.outline-label:before {
counter-increment: h4;
content: counter(h1) "." counter(h2) "." counter(h3) "." counter(h4) ". "
}
.outline-h5>.outline-item>.outline-label:before {
counter-increment: h5;
content: counter(h1) "." counter(h2) "." counter(h3) "." counter(h4) "." counter(h5) ". "
}
.outline-h6>.outline-item>.outline-label:before {
counter-increment: h6;
content: counter(h1) "." counter(h2) "." counter(h3) "." counter(h4) "." counter(h5) "." counter(h6) ". "
} |
TOC自动序号
Typora支持插入内容目录功能,该功能虽目前不再需要,但为了功能的完备,这里对其兼容
首先依然是根据其HTML标签定义计数器:
1
2
3
4
5
6
7
8
9
10
11
12
13
14
15
16
17
18
19
20
21
22
23
24
25
26
27
28
29
30
| /* TOC 自动序号 */
.md-toc-inner {
text-decoration: none;
}
.md-toc-content {
counter-reset: h1toc
}
.md-toc-h1 {
margin-left: 0;
counter-reset: h2toc
}
.md-toc-h2 {
margin-left: 1rem;
counter-reset: h3toc
}
.md-toc-h3 {
margin-left: 2rem;
counter-reset: h4toc
}
.md-toc-h4 {
margin-left: 3rem;
counter-reset: h5toc
}
.md-toc-h5 {
margin-left: 4rem;
counter-reset: h6toc
}
.md-toc-h6 {
margin-left: 5rem;
} |
在插入的目录前也生成序号内容:
1
2
3
4
5
6
7
8
9
10
11
12
13
14
15
16
17
18
19
20
21
22
23
24
| .md-toc-h1:before {
counter-increment: h1toc;
content: counter(h1toc) " "
}
.md-toc-h2:before {
counter-increment: h2toc;
content: counter(h1toc) ". " counter(h2toc) ". "
}
.md-toc-h3:before {
counter-increment: h3toc;
content: counter(h1toc) ". " counter(h2toc) ". " counter(h3toc) ". "
}
.md-toc-h4:before {
counter-increment: h4toc;
content: counter(h1toc) ". " counter(h2toc) ". " counter(h3toc) ". " counter(h4toc) ". "
}
.md-toc-h5:before {
counter-increment: h5toc;
content: counter(h1toc) ". " counter(h2toc) ". " counter(h3toc) ". " counter(h4toc) ". " counter(h5toc) ". "
}
.md-toc-h6:before {
counter-increment: h6toc;
content: counter(h1toc) ". " counter(h2toc) ". " counter(h3toc) ". " counter(h4toc) ". " counter(h5toc) ". " counter(h6toc) ". "
} |
出于美观,调整各级标题的边间距:
1
2
3
4
5
6
7
8
9
10
11
12
13
14
15
16
17
18
| .md-toc-h1 .md-toc-inner {
margin-left: 0;
}
.md-toc-h2 .md-toc-inner {
margin-left: 0;
}
.md-toc-h3 .md-toc-inner {
margin-left: 0;
}
.md-toc-h4 .md-toc-inner {
margin-left: 0;
}
.md-toc-h5 .md-toc-inner {
margin-left: 0;
}
.md-toc-h6 .md-toc-inner {
margin-left: 0;
} |
解决H3序号消失
编辑h3及以后的标题时,会出现序号消失的情况。原因为base.control.css中定义了包含md-focus的标题样式表:
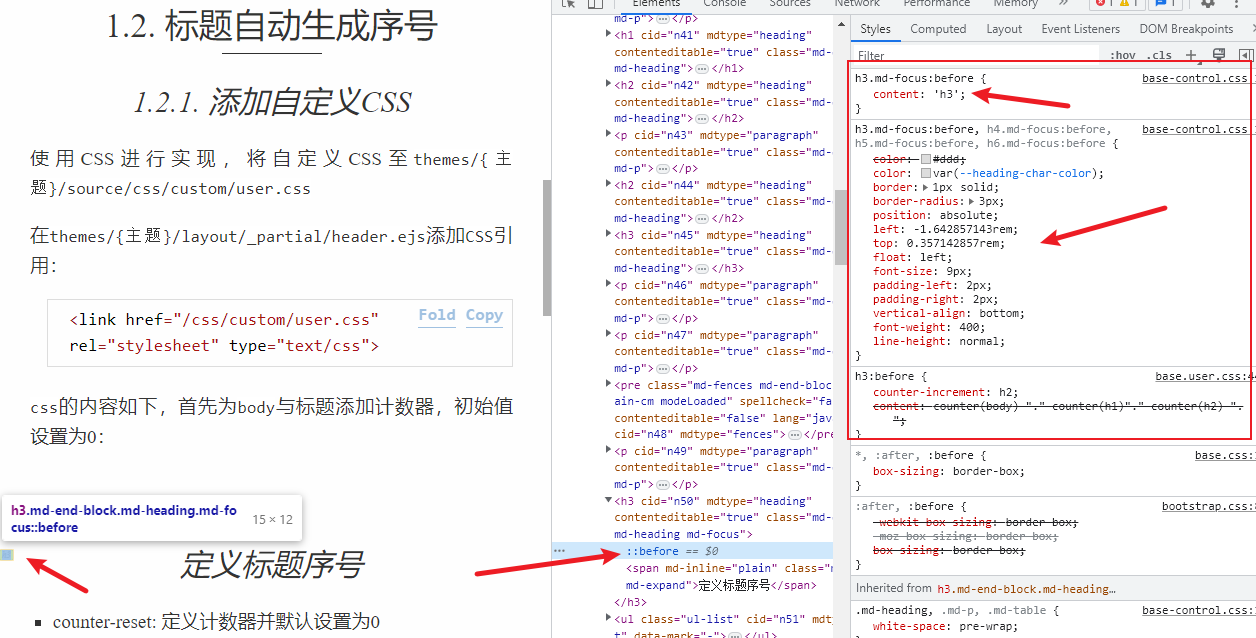
其重载了h3:md-focus:before的content以及其它属性,从上图可以看出,h4,h5,h6都受到影响
这里不直接修改base.control.css,依然在base.user.css中重载对应标签:
1
2
3
4
5
6
7
8
9
10
11
12
13
14
15
16
17
18
19
20
21
22
23
24
25
26
27
28
29
30
31
32
33
34
35
| h3.md-focus:before {
counter-increment: h2;
content: counter(body) "." counter(h1)"." counter(h2) ". ";
}
h4.md-focus:before {
counter-increment: h3;
content: counter(body) "." counter(h1)"." counter(h2)"." counter(h3) ". ";
}
h5.md-focus:before {
counter-increment: h4;
content: counter(body) "." counter(h1)"." counter(h2)"." counter(h3)"." counter(h4) ". ";
}
h6.md-focus:before {
counter-increment: h5;
content: counter(body) "." counter(h1)"." counter(h2)"." counter(h3)"." counter(h4)"." counter(h5) ". ";
}
h3.md-focus:before,
h4.md-focus:before,
h5.md-focus:before,
h6.md-focus:before {
color: #333;
border: unset;
border-radius: unset;
position: unset;
left: unset;
top: unset;
float: unset;
font-size: unset;
padding-left: unset;
padding-right: unset;
vertical-align: unset;
font-weight: unset;
line-height: unset;
} |
资源引用路径一致性
使用Hexo时,发布的文章是放置于source/_posts下,对于未发布的文章,可以利用Hexo提供的草稿功能。
将其放置于source/_drafts,待编辑完成后通过命令或手动移至_posts下即可发布。
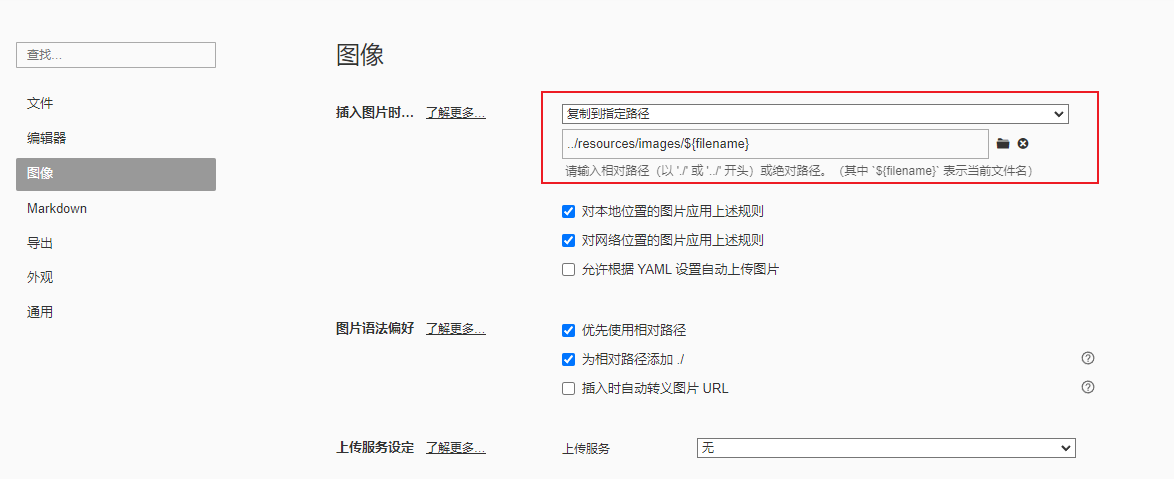
因此,为了文件移动路径后资源引用正确,资源路径统一放置于source/resources/下
source/resources/images:存放文章引用的图片资源
利用定义Typora的图像插入操作,可以避免编写MD时手动处理图片存放路径的问题:
Typora插件
修改Typora安装目录下的Window.html,使其引用指定目录下的Javascript文件实现自定义功能
Github上的Typora插件项目便是以这种方式进行实现的:
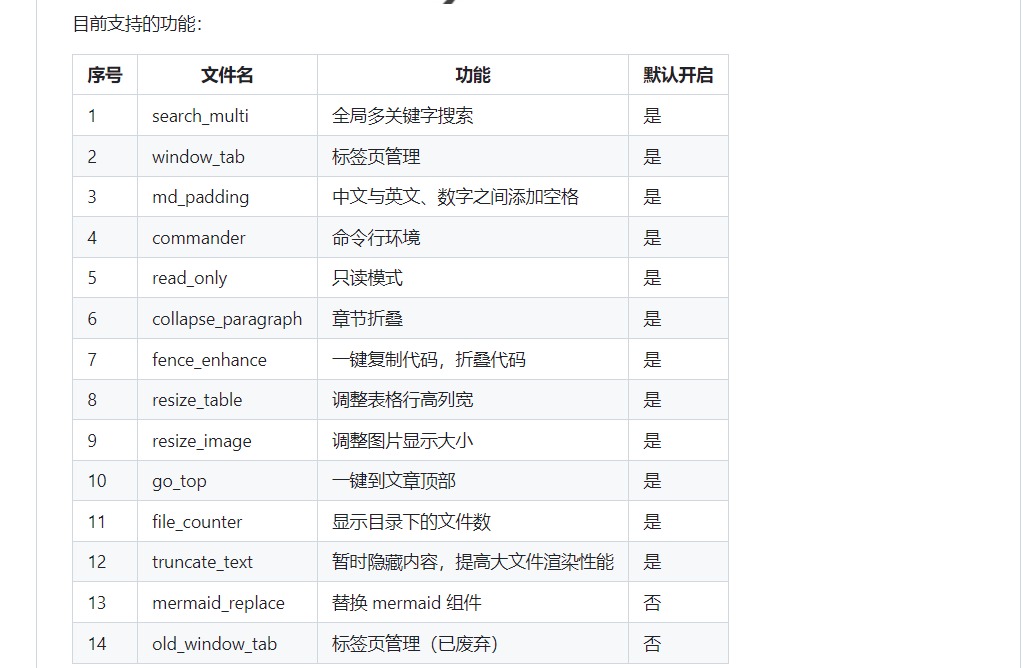
直接删除插件文件夹内的JS文件,即可按需删除不需要的功能,建议移除以下功能:
- window_tab
- old_window_tab
- auto_number
- file_counter
- resize_table
- resize_image
- commander
- export_enhance
插件添加方法:打开Window.html,搜索下列二者之一:
1
2
3
| <script src="./app/window/frame.js" defer="defer"></script>
或
<script src="./appsrc/window/frame.js" defer="defer"></script> |

在其后添加
1
| <script src="./plugin/index.js" defer="defer"></script> |

Typora行内公式尺寸
默认行内公式受到行高的限制会显示的很小,影响观看。在base.user.css中添加以下配置即可解决:
1
2
3
4
5
6
7
8
9
10
| /* 行内公式样式调整(排除块级公式) */
.md-inline-math .MathJax {
font-size: 150% !important; /* 增大行内公式尺寸 */
}
/* 包含行内公式的段落自动增加行高,避免重叠 */
p:has(.md-inline-math),
li:has(.md-inline-math) {
line-height: 2 !important;
} |
Typora图片并列支持
默认多张图片会换行显示,对于某些关联性强的展示而言并不适合,增加以下CSS用于支持多图片的并列:
- 要求Markdown中两张图片的文本不能换行,比如:

1
2
3
4
5
6
7
8
9
10
11
12
13
14
15
16
17
18
19
20
21
22
23
24
25
| /* 单张图片撑满宽度 */
p > .md-image:only-child {
display: block;
max-width: 100%;
margin: 0 auto;
}
/* 包含多张图片的段落使用 flexbox */
p:has(.md-image:not(:only-child)) {
display: flex;
gap: 2%;
align-items: stretch;
}
/* 连续多张图片并列显示 */
p > .md-image:not(:only-child) {
flex: 1;
display: flex;
}
p > .md-image:not(:only-child) img {
width: 100%;
height: 100%;
object-fit: contain; /* 保持比例,图片完整显示 */
} |
参考资料
Github Actions自动部署Hexo博客
Typora插件
创建Github Page站点
Hexo添加文章目录
Hexo添加回到顶部按钮
Comments